Friday, June 17, 2011

cross top for boy

I am enjoying being off work, taking trips to the park, going out for coffee, and having time to sew!  I started working on this cross top for an upcoming baby shower, but as I was putting it together, I started realizing that my 0-3 month pattern I based it off of, was starting to look much more like it would fit my 19 month old...and it did!  So, I decided to finish it as is for Shea.  I love the way it turned out!  I used the same pattern I used for the Kimono Sleep Sack, and modified it.  I extended the bodice to make it shirt length, added binding all along the edge and then sewed down the side and front.  The buttons are just to look cute.  


Yes, he had to be bribed with a cookie to sit still.  Just keeping it real.


My favorite part about it is the personalized iron on tag (sorry for the low quality picture, it reads "Shea Micah Ellis With love, from mommy").:

The only funny thing about it is that since it was initially intended for a newborn, I made the hand mitt pockets on the sleeve cuffs...I kind of like the detail on the sleeve though, and I might add a button on each of those and sew it closed.


Who couldn't love this kid??


Monday, June 13, 2011

recently

Well, needless to say, I did not get my act together and enter in spring top last month.  I haven't done very much "interesting" sewing lately - just mending and hemming some old pants into shorts for Shea.  I have some grey striped seer-sucker fabric I found while thrifting which I have some plans for, but you know me - I don't make promises about these things.  We're getting ready to pack up and move in the next couple of weeks, however, so I do have some motivation to get some projects done - I won't have an easily accessible sewing machine after we move for a little while.


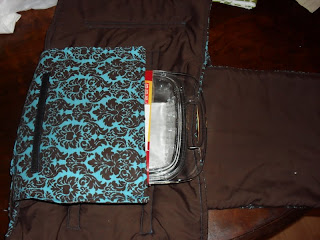
Anyway, I have a few pictures to share.  For my soon to be sister-in-law's bridal shower, I made a casserole carrier (love it and want to make one for myself at some point!  First I'm working on one for a friend though).


Here's how it works.  Set dish in middle.

Fold over flap and velcro.


Fold over other flap and velcro.  Easy, insulated and secure!


I also whipped up some tea-towels (or maybe napkins?).  Kitchen linens, at any rate.


Friday, April 29, 2011

selfish sewing

Well, I haven't really figured out what I want to make for Spring Top Week, but I did hit my pile of clothes to alter this week, and finished a couple of pieces.


I found this XL Merona tee at the Goodwill for $2.  Recently, I've been very drawn to yellow and stripes, so this one caught my eye.  At first, I figured I would just take it in and at least have a new cheap tee.  After I tried it on though, I realized I also didn't like the neckline very much.  So, either I could just change the shape and put some bias tape over it, or do something fun with it.  I looked online and gathered some inspiration:
source

source


source
source


I ended up cutting a scoop neck line (ended up being a little low cut, but I'm used to wearing tanks underneath everything anyway), and making little "flower petals" out of the scraps and an old yellow sheet I had.  

Here's the finished product:


This was an easy project to complete in an evening.  I think it would've gone quicker, except that I spent so much time changing my mind over how I wanted it to look!  Do this when you're in a very creative and patient mood.  Here's a quick how-to:

1. cut the shape of your neckline.  I added some bias tape to the back of the neckline from shoulder to shoulder, planning on covering up the ends with the embellishment.


2. start making your petals!  I took a piece of cloth,

folded it into quarters and placed my template (aka whatever jar I had lying around) on top and traced it.

then I took my circles and folded them in half...


...and then into quarters.  Don't fold it perfectly.  Kind of skew it to the side a little.

I made each one a little different to add some texture.  You can even fold the end back to get a skinnier one like this:

3.  After you've made a bunch of these, get your pins out and start layering them on your tee the way you want.  NOTE:  make sure they don't extend too high above your neckline, or it will flop down due to the weight. The top of your embellishment should just barely extend past.


Once you have them all on there, sew it down!  I just top stitched with a light beige around the parameter, and then went up and down through the middle to make sure they were all pinned down.  This will give it more of a scrunched look.  If you want it to stay more puffy, you might want to tack it down by hand with invisible thread.


So thrilled to have a new spring shirt for only $2 and a little bit of time!

hmm...what else can I bring some yellow into...?


Friday, April 15, 2011

spring top

is happening.


I'm thinking about entering this year.  Mainly just because I want to start sewing some things for myself, but I don't get motivated that easily, since I can never decide on what I want to make!


Head over for more info on the contest, whether interested in entering or just voting!  Some really cute things come out of this!

Saturday, April 9, 2011

slipcovering it up today!


Here is where I was about an hour ago...

And here is where I am now:


Phew.  Still have the left arm and bottom to do of the main slipcover, and then need to finish that cushion.  I'm ready for a break!